
Personnel Maintenance
Creating or changing basic personnel information
Understanding personnel entries
Understanding position selections
Add Default Duties (Call Signs etc)
Transferring time between time banks
Reinstate a person made a leaver by mistake
Introduction
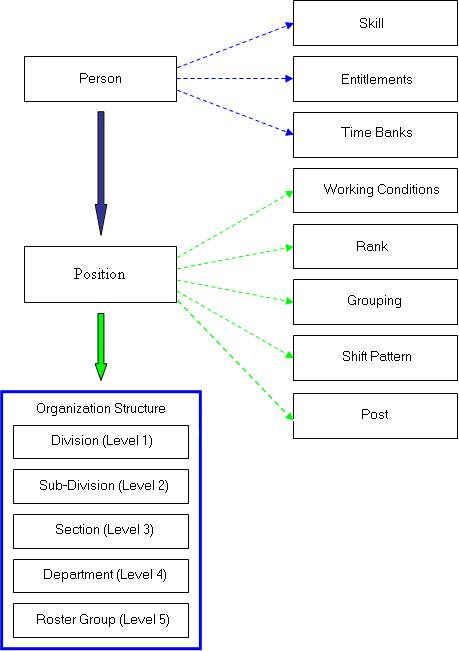
Each person exists in a particular part of the organization (Position) e.g. a special operations unit, divisional uniform team, area CID team, volunteer unit, etc.
The organization is based on five levels, which are grouped to form an Organization Structure (see: Creating an Organization Structure). All personnel sit at the 5th level of that organization structure.
Each person has a specified rank/grade (Rank) and works a pattern of shifts (Shift Pattern). They also achieve and maintain specialised skills (Skills). They may be entitled to an Annual Leave allowance (Time bank), which is generated from their Entitlement according to service levels, and usually to compensation for working extra time based on their “Collective Agreement” (Working Condition). They may also be allocated to a Post within the organization.
Before adding a new person, these underlying details must already exist so they can be used in the appropriate areas.
The following diagram shows you how these relate.
This section deals purely with Personnel Maintenance. For details of how to create the other elements required, please refer to the relevant pages.
|
|
The minimum requirement is that the person basic information (see Creating basic personnel information) below and their position (see Adding a joiners position) MUST exist. Without these, CARM will not be able to roster them or carry out enquiries for them. |

Personnel Maintenance
Select Personnel Maintenance > Person
Changing an existing persons details
Select person as normal (see Making Selections for more details). Their details will be presented.
· OR
Select yourself. Your details will be presented.
· OR
Search for the person to change using Search capability on the page below.
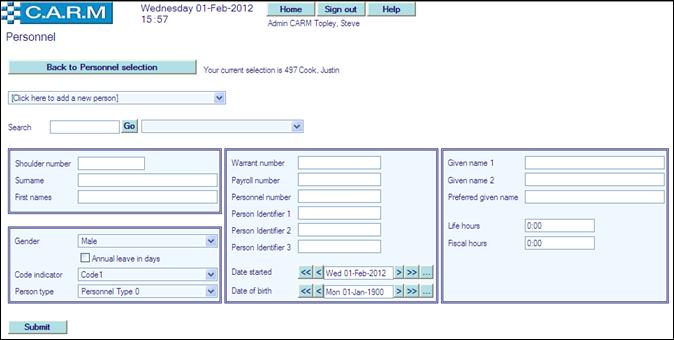
Adding a new person
Select Click here to add a new person from the drop down list.
Creating or changing basic personnel information
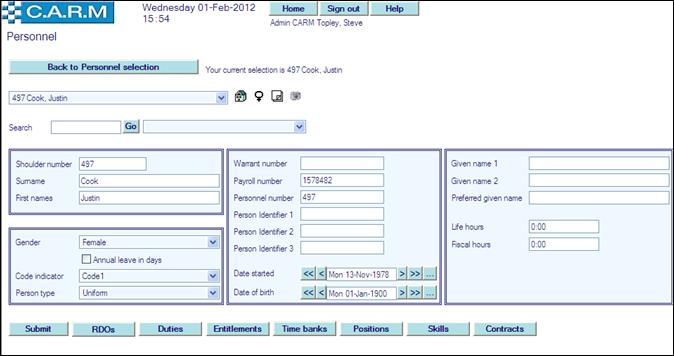
· Basic information includes details of the individual e.g. Personnel Number, Surname together with organization requirements such as Date Started.
· Complete the details as in the example below.
· Click Submit.
|
|
Leaving Personnel Maintenance without adding a position will prevent the standard Personnel Selection window from finding the new person. However this facility allows them to be found and subsequently have a position added. |

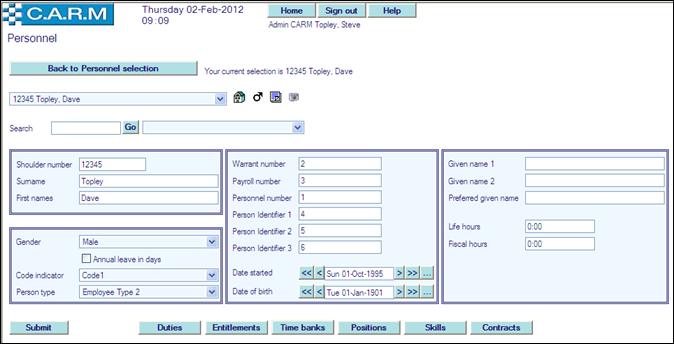
Understanding personnel entries
For data fields in this window.
NB. Terminology in this section is as per the examples (in use at the RCMP) but may easily be changed for the organization.
Shoulder number
![]()
Is the Regimental number or (for civilians) employee number (optional) of the person. It can be up to 6 characters long and may include letters and numbers.
Surname
![]()
Surname of the person and can be up to 30 characters long. This is mandatory. System Administrator will set the function parameters in System Maintenance to control the case setting for surname, first names and given names. (See System Maintenance for more detail).
Firstnames
![]()
First name(s) of the person and can be up to 30 characters long. This is mandatory. System Administrator will set the function parameters in System Maintenance to control the case setting for surname, first names and given names. (See System Maintenance for more detail).
Gender
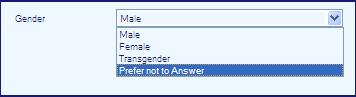
Select Gender from the drop down. This is used in the Duty Plan and some other windows if the “display gender symbol” parameter is turned on.
Annual leave in days
![]()
A tick in this box will display and hold the Annual Leave Time bank of the person in days (to the nearest half day). Most organizations use hours. If you use hours, leave this box blank
Code indicator
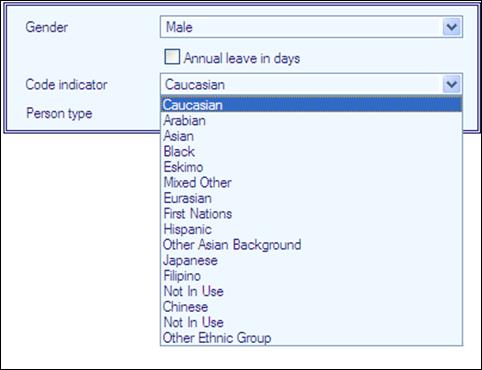
Originally designed for ethnicity, these codes may not be in use in the organization. If they are not in use, Code 1-10 will be shown. If they are in use, select the appropriate one from the drop down list.
Person type
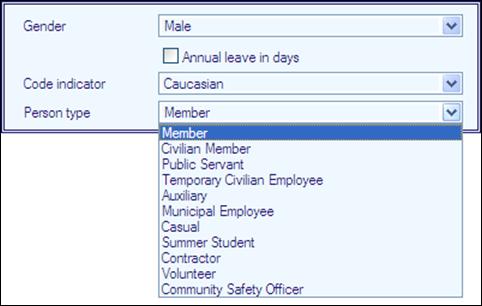
Options for different Person Types are provided. Select the appropriate one from the drop down list.
HRMIS, personnel and payroll numbers
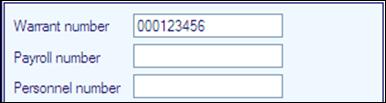
Optional fields to enter the HRMIS number, payroll number and personnel numbers if required. Entries may be used during interfacing with secondary systems.
Identifier 1, 2 and 3
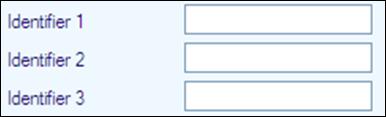
Are additional optional fields for personal use. There is no validation on any of these fields, so consistent formats are required e.g. using upper/lower case, etc.
Date started
![]()
Date the person commenced with the organization. This is used for determining seniority.
Date of birth
![]()
Persons birth date.
Given Name(s)
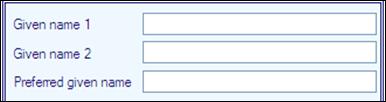
Person given names. System Administrator will set the function parameters in System Maintenance to control the case setting for surname, first names and given names. (See System Maintenance for more detail).
Life hours.
![]()
Hours accumulated actually on shift commencing on a persons’ original start date up to the current date. However the calculation criteria are set by the organization to include/exclude e.g. any Extra pay hours over normal hours etc.
Fiscal hours.
![]()
Hours accumulated actually on shift during a persons’ previous fiscal year. However the calculation criteria are set by the organization to include/exclude e.g. any Extra pay hours over normal hours etc.
Rest Days.
![]()
Maintain Rest Days
Duties
![]()
Persons Duties
Entitlements
![]()
Entitlements: is where to add the details of recurring allowances such as annual leave.
(see Entitlements for full details).
Time banks
![]()
Manually add banks of time for a person. This may be annual leave if entitlements have not been set up the (see Time banks below for full details).
Positions
![]()
Click to show:
![]()
View, add or change the location and other positional information or make the person a leaver.
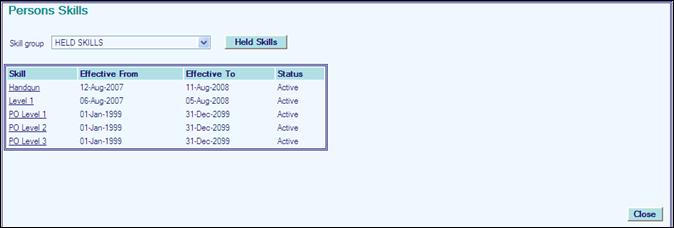
Skills
![]()
Add skills, together with any appropriate gained and expiry dates, to a person.
Contracts Information
![]()
(see Contracts below for full details)
Adding a joiners position
Position is the location of the person within the organization. A joiner position is created for a new person who currently does not have a position.
Click Positions
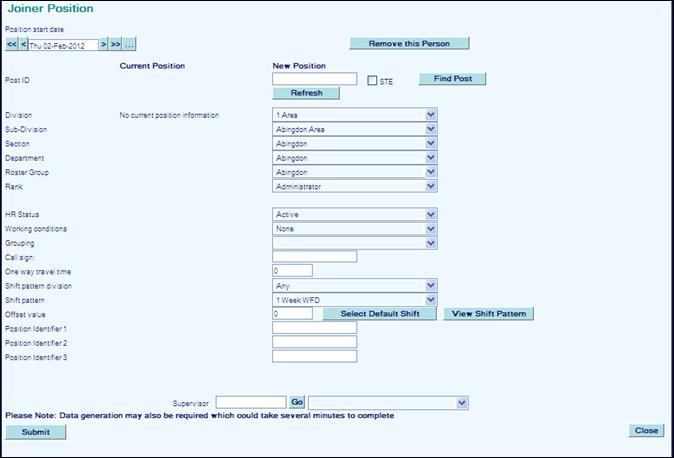
· Complete the window as in the example above.
· Click Submit.

Confirmation: of selected dates prior to committing to the changes.
· If you are sure of the Joining Date click Confirm.
· If you wish to change the Joining Date click Cancel to return to Joiner Position page and amend the Position start date.
· Click Submit.
· Click Confirm.
· A message is returned in the main page to advise that data regeneration is in progress. This means the roster information is being generated for the person based on their Position start date, shift pattern and offset information.
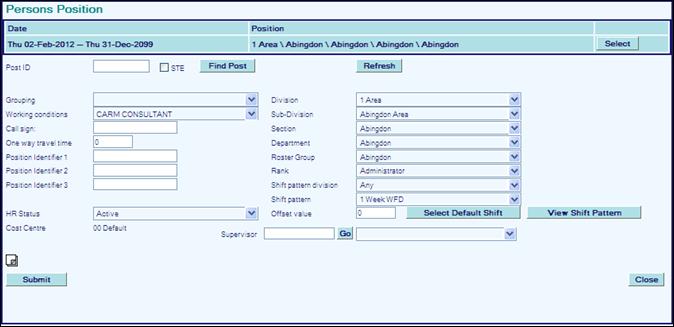
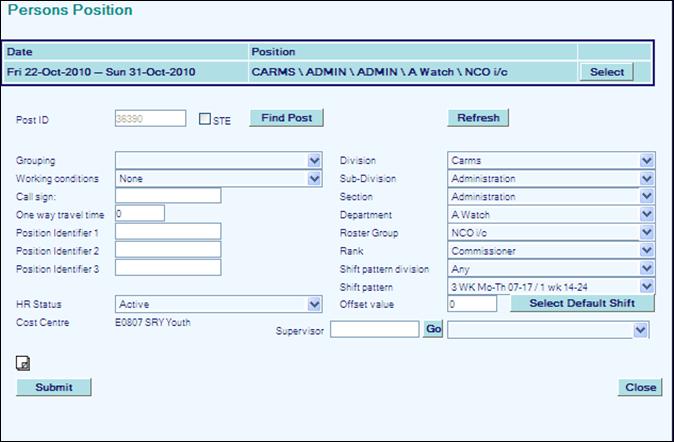
Understanding position selections
A brief description of each field: some of which are mandatory.
Remove person
![]()
If a person currently doesn't have a position, this enables removal of the person completely from the system. Once a person has a position, that person can only 'leave' rather than be removed. Enable a person to be removed who may have been added in error.
If a person has been added with erroneous details and you wish to remove that person and add them again with correct details then make the person a Leaver and enter a Person leaving date that pre-dates the persons Date started. Then click Remove this Person.
Position start date
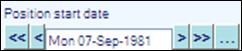
Date the person started in this location. For a joiner, this is likely to be the same as the Start Date in the main Personnel Maintenance window.
Post ID

Identifies a post within the organization (optional) (See Find a Post below)
Division (Level 1)
![]() :
:
First of the 5 organization structure levels
Sub-division (Level 2)
![]()
Second of the 5 organization structure levels
Section (Level 3)
![]()
Third of the 5 organization structure levels
Department (Level 4)
![]()
Fourth of the 5 organization structure levels
Roster group (Level 5)
![]()
Fifth of the 5 organization structure levels usually, this represents the team or unit they will be working in.
Rank
![]()
Normal Rank: or grade of the person.
Acting rank
![]()
Not usually required for joiners. It is to indicate an acting rank for a period of time. If the person is not acting during this period, it will be the same as their normal rank.
HR Status
![]()
Normal Human Resources Status of the person.
Working conditions
![]()
Assigns a person to a set of compensation rules and options: selecting their working condition ensures the correct compensation is generated automatically for them when they work during non-working time e.g. shift extension, cancelled rest day, recall to duty. See Working Conditions for full details.
Grouping
![]()
Groupings allow you to associate personnel with others, without them physically belonging to the same organization structure. These have previously been used for such things as identifying Search Trained officers or response squads. NB This facility is included for compatibility with previous versions of CARM. The use of Favourites within CARM usually makes this facility unnecessary.
Call sign
![]()
Used if the person always holds the same call sign. It is usually used for links to Command and Control.
One way travel time
![]()
One way travel (time from home to normal place of work - in minutes) is used in conjunction with some of the compensation rule options e.g. Minimum Compensation, for some personnel. The one way travel value may be included as part of the compensation.
For example, if one way travel time was 30 minutes, and there was at least 1 hour between the end of a tour and the start of a return to duty (twice one way travel time), “One way travel time” might be included. If there was also at least one hour at the end of the return to duty and the start of the next tour, another “One way travel time” might also be included. See the CARM Administrator or HR department for full details.
Shift pattern division
![]()
Shift patterns can be held against a specific division. It is not mandatory to store shift patterns this way, it is an option for easier reference. They can be, and usually are, held under the Any category.
Shift pattern
![]()
The pattern of shifts the person works. They are usually named appropriately to help you find the correct one e.g. Uniform 28 Day. For flexitime workers, the shift pattern is the flexitime scheme that governs the rules of the flexitime account.
Shift pattern and shift pattern division are managed via the Shift Patterns Maintenance routine (see Creating shift patterns for full details).
Offset value
![]()
The offset value is the number of days into the pattern a person starts that pattern e.g. a 28 day pattern, which is worked by four teams, may have Team A starting at the beginning of the pattern (offset 0), Team B are offset by 7 days, Team C by 14 days and Team D by 21 days. It ensures that not all teams/individuals work exactly the same shift on exactly the same day.
Shift pattern default
![]()
This button allows automatic selection of the shift pattern and offset associated with the selected organization structure (See Forming the structure).
Identifier 1, 2 and 3
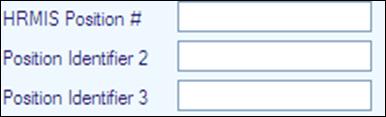
Additional and optional fields are available for personal use. In the example above, identifier1 holds an HRMIS Position Number for the RCMP. There is no validation on any of these fields, so consistent formats are required e.g. using upper/lower case, etc.
Supervisor
![]()
This is the immediate supervisor of the person. It is used as a default for Extra pay claims and for authorizations of requests for leave/TOIL.
Finding a Post
A brief description of how to find a Post within the Organization that this position refers to (optional)
![]()
.
· Click Find Post
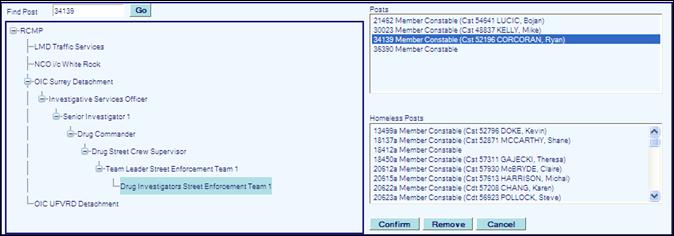
· Either, enter a post ID and click on Go to search for a particular known post, or expand the organization structure as necessary to find the required post.
· Select the post from the List of Posts (or Homeless Posts if the post has not yet been allocated to the organization)
· Click Confirm
![]()
· Click STE if this position is Surplus to Establishment
· Click Refresh to automatically complete the organization structure and rank elements of the position as per the related Post.
· Click Submit to record the Post ID.
|
|
When a Post is found and there is/are Incumbent(s) as of today’s search date, then the first Incumbents Name will be displayed alongside the Post ID. |
Remove a Person from a Post
A brief description of how to remove a person from a Post within the Organization that this position refers to (optional)
.
· Click Find Post.
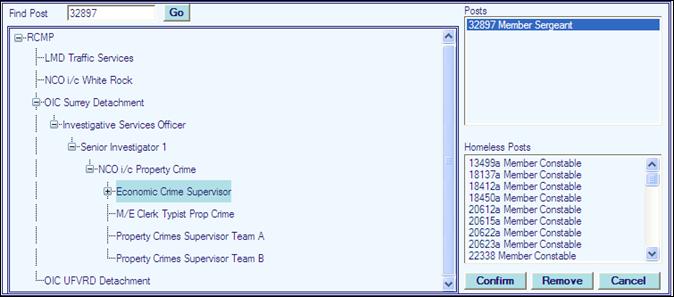
· Click Remove
![]()
· Click Refresh to automatically complete the organization structure and rank elements of the position as per the related Post.
· Click Submit to record removal.
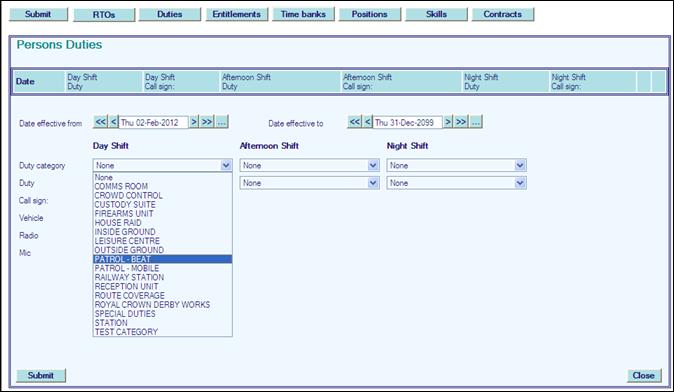
Add Default Duties (Call Signs etc)
Facility to record default duty information against a person and ability to apply the default to a persons shift during Team Bookings. (See Team Bookings for further details)
Select Personnel maintenance > Person
· Click Duties
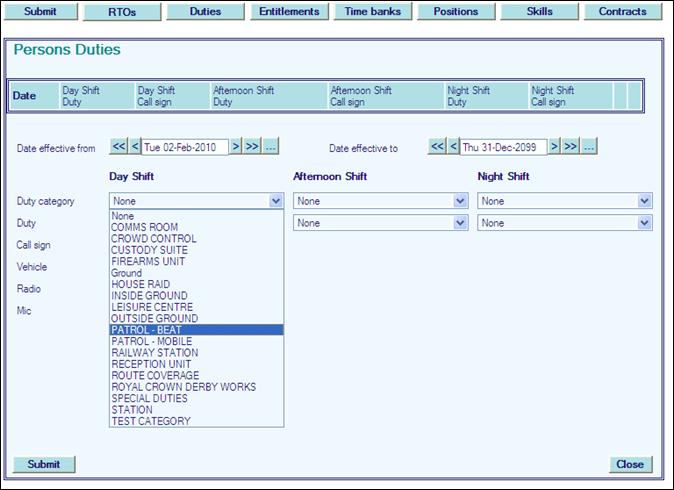
· Select Duty category from the drop down lists for each required Shift type.
· Select Duty from the drop down lists for each required Shift type.
· Enter Call signs, Vehicle IDs, Radio IDs, and or Mic IDs as required.
· When all required details are added Click Submit.
· Click Close.
· The Default details will appear as follows

· Click Select to make any changes required.
· Click Delete to remove default details as required.
Adding an entitlement
Entitlements are used for recurring allowances such as Annual Leave.
The service intervals for the entitlements are created via a separate maintenance routine (see Maintaining time bank entitlements). That setup governs any cross over between service intervals e.g. someone who moves from the 0-2 band to the 2-5 band during that annual leave year and any changes of rank.
Before adding an entitlement for a person, the activities they are due an entitlement for and the recurring date for which to generate that entitlement, need to be identified. For most organizations this is 1st April or 1st January.
When the entitlement is generated, it will be credited to the appropriate time bank, ready for the person to use.
· Select Personnel Maintenance > Person
· Click Entitlements
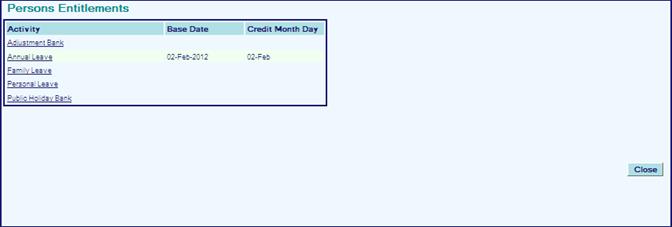
· Select Activity to add an entitlement for e.g. Annual Leave.
· Check Base date. This will automatically be set to the persons start date and is normally correct. However, personnel who rejoin after a break or join from another Police or other service, sometimes have their previous service considered for entitlement purposes in which case adjust the 'base date' accordingly.
· Select the recurring date the entitlement is to be generated on from the Credit date drop down lists. It will automatically default to day and month of the base date when that is set.
· Click Add, Change or Delete as appropriate
· Repeat the process for any other entitlements to be created.
· Click Close.
|
|
The actual entitlement calculated will automatically consider proportional time i.e. for Part-timers. The figure calculated will use the Average and Standard Week amounts in the Shift Pattern they are assigned to. See Maintaining Shift patterns for more details. |
Adding a time bank
Time banks are used to generate an allowance of time for someone. Usually, it is used for non-recurring allowances e.g. Study or Parental leave. It is also used for adding opening balances at implementation stage.
They may also be used to generate opening entitlement balances if the person commences part way through an entitlement year. If Entitlements are not used to automatically generate Annual Leave allowances, it is necessary to manually create Time banks via this facility.
Use it also to create manual entries for any purpose, including perhaps adding travel time for training courses.
To use an activity in a Time bank, set the Bankable flag in Activity Maintenance for this activity.
Click Time banks
· Click Time banks drop down.
· Select the activity to add a Time bank for, from the drop down list e.g. Annual Leave.
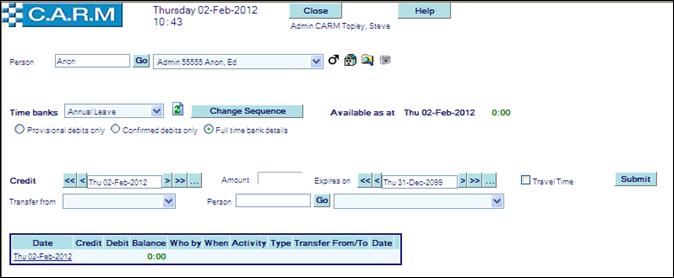
· Enter Credit start date for the Time bank.
· Enter Amount of time (may be negative for debits).
· Enter Expires on end date for the Time bank. Remaining time will automatically expire if unused by this date.
· Check Travel Time option if this is for travel time purposes
· Click Submit.
|
|
See Time Banks for further explanation of this area. |
Transferring time between time banks
Occasionally there may be need to transfer time between time banks. This is only recommended if there is supporting Policy. For example, it may be decided that from ‘n’ date unused Lieu time off for pay will expire but existing outstanding Lieu time off will not be paid for. A time bank could be created e.g. Old Lieu Time off, then transfer existing balances to that, before implementing the new policy.
· Click Time banks
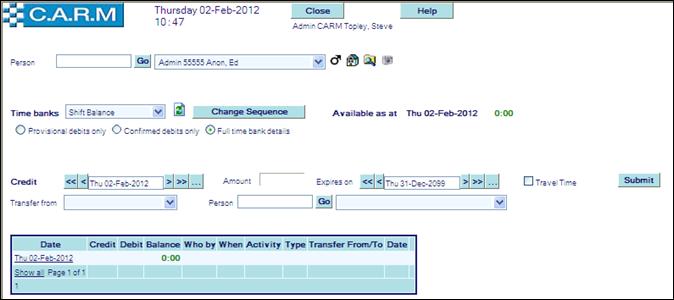
· Select Time banks to transfer into.
· Select Transfer from time bank.
· Enter the Credit date.
· Enter the Amount of time (negative to transfer the opposite way).
· Enter Expires on end date for the Time bank. Remaining time will automatically expire if unused by this date. If the time is not to expire, leave this date set to the system end date 31/12/2099.
· Check Travel Time option if this is for travel time purposes
· Click Submit.
|
|
See Time Banks for further explanation of this area. |
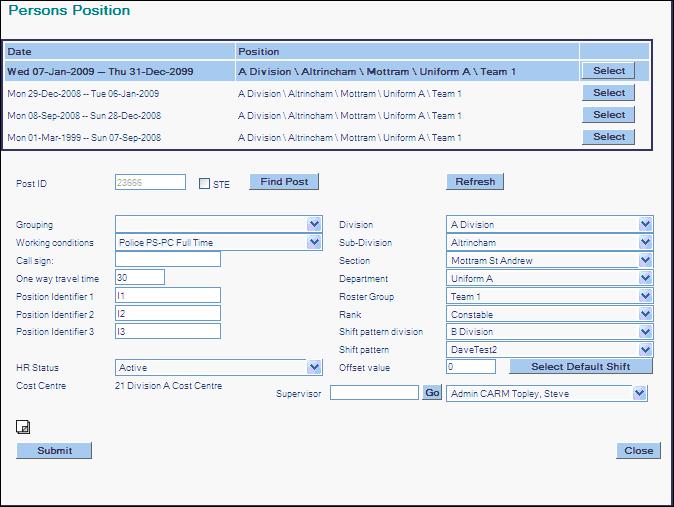
Viewing a person
View person’s details.
· Click Positions from the main Personnel Maintenance window
![]()
· Click View Positions from the main Personnel Maintenance window
Transferring a person
Transfer a person between parts of the organization.
· Click Positions from the main Personnel Maintenance window
![]()
· Click Transfer from the main Personnel Maintenance window
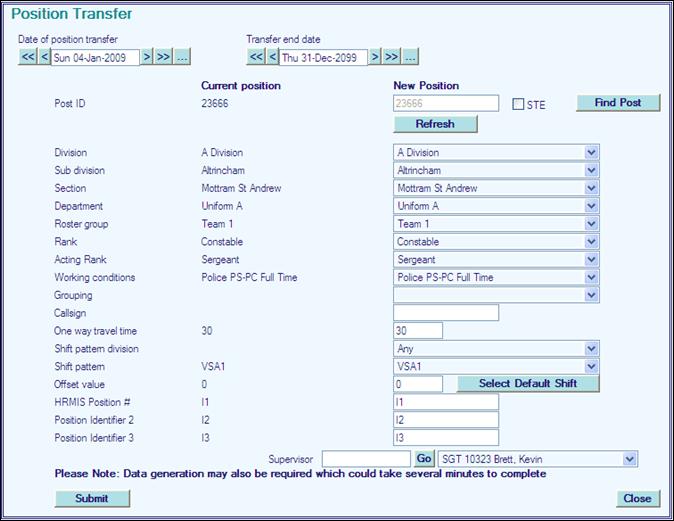
· Enter Date of position transfer for the person to transfer to their new position.
· Enter Transfer end date of the transfer (this is intended for temporary transfers). If the transfer is permanent, leave this date at the default.
· Select the new position details from the New Position column.
· Use Select Default Shift button to automatically select the shift pattern and offset associated with this part of the organization or use the drop down to select an alternative.
|
|
Check your details carefully before Submitting. If you change the persons shift pattern, the Regenerate Data routine will automatically be run and you may have to re-apply any previous commitments using the report generated. See below for additional steps for this process. |

· Click Submit.

Confirmation: of selected dates prior to committing to the changes.
· If you are sure of the Transfer Dates click Confirm.
· If you wish to change the Transfer Date click Cancel to return to Position Transfer page and amend the Position start date.
· Click Submit.
· Click Confirm.
Changing a persons shift pattern
When changing a persons shift pattern (or when a person leaves), future commitments are checked so that any changes or shortfalls as a result of the transfer can be addressed.
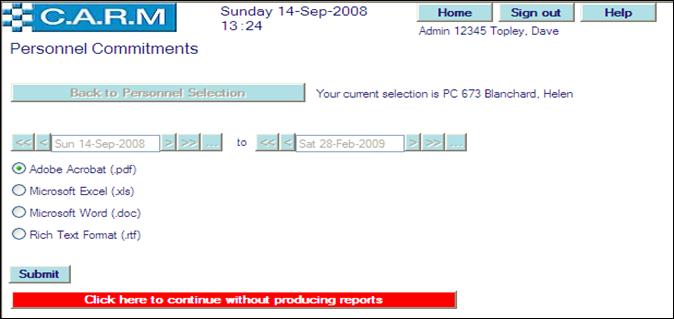
To view the Commitments Report:
· Select the report format required i.e. Adobe, Excel, Word, or Rich Text.
· Click Submit.
· Persons Commitments Report will be shown in the chosen format, with dates and activity details to view, print and action as required.
· For example:

Close the report when viewed or printed.
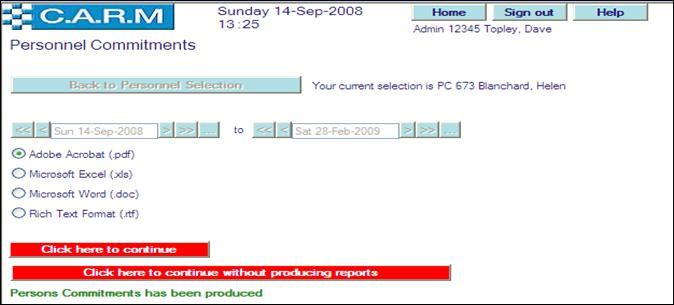
· Select Click here to continue to complete the Regenerate Data process.
· Messages to show the regeneration process has started and completed will be displayed in My Messages.
To continue without viewing the Commitments Report:
|
|
It is highly recommended that Commitments Reports are viewed or printed to ensure full awareness of any contingency/shortfall planning. These need to be undertaken and any commitments will need to be re-applied. |

· Click, Click here to continue without producing reports.
Reassign a Person
Enables authorized personnel to move personnel between teams and to change their shift patterns, but not to change any of the HR elements such as working conditions, Posts, etc.
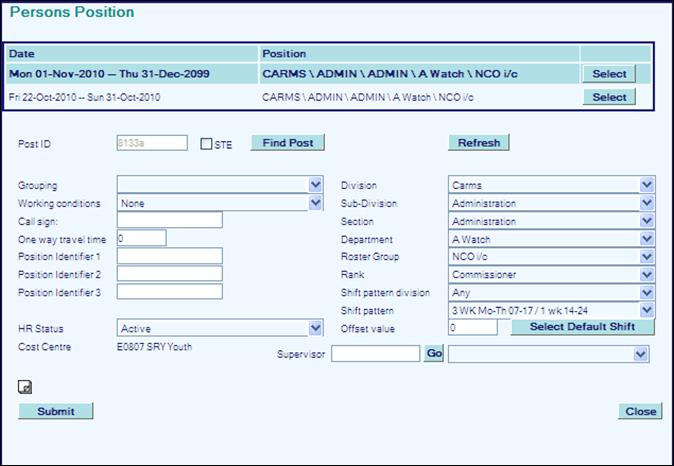
Making a person a leaver
Record a person leaving the organization.
· Click Positions from the main Personnel Maintenance window
![]()
· Click Leaver
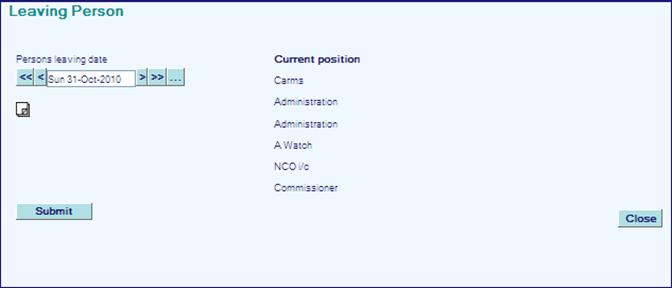
· Enter their leaving date in Persons leaving date.
· Click Submit.

Confirmation: of selected dates prior to committing to the changes.
· If you are sure of the Leaving Date click Confirm.
· If you wish to change the Leaving Date click Cancel to return to Leaving Person page and amend the Persons leaving date.
· Click Submit.
· Click Confirm.
· If commitments are found after their leaving date, they can be reported to you. See Changing a person’s shift pattern for details.
Reinstate a person made a leaver by mistake
If you have terminated a person’s employment by mistake use Transfer to reinstate the person using the day after the leaving date as the transfer date and enter the new position details the same as the details on the leaving date.
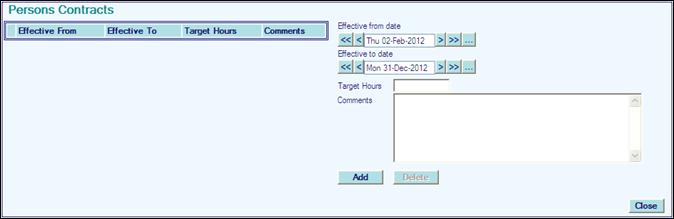
Add Part Time Contracts
Timesheet entry facility allowing for Part Time Contracts measuring time spent and future commitments against contracted time. Shift patterns may consist of a combination of standard shifts (for the fixed portion of the contract) and flexi shifts (for the variable portion).
· Click Contracts
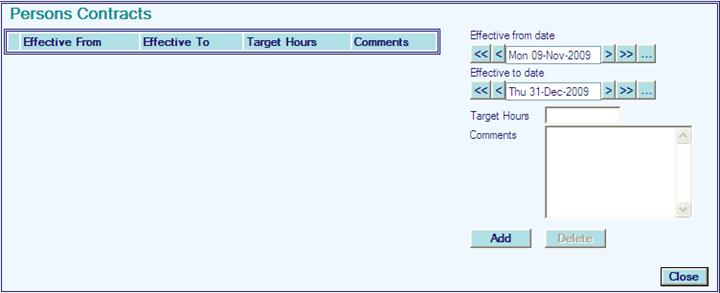
· Enter Effective from date.
· Enter Effective to date.
· Enter annual Target Hours of the contract.
· Enter any comments required in the Comments box.
· Click Add
· Click Close to return to Personnel Maintenance page.
Timesheet entry facility allowing for Part Time Contracts measuring time spent and future commitments against contracted time. Shift patterns may consist of a combination of standard shifts (for the fixed portion of the contract) and flexi shifts (for the variable portion).