
Shift Patterns
Understanding standard shift pattern selections
Shift pattern details - Non Flexitime
Shift pattern details - Flexitime.
Guesting within a Shift Pattern
Project/Locations within a Shift Pattern
Project/Locations within a Work Free Shift Pattern (Casual Workers)
Shift pattern calculated values
Troubleshooting shift patterns
Creating Shift Patterns
A Shift Pattern is the pattern of shifts a person works. It includes working days, Rest Days and Work Free Days. It may be for a full-time, part‑time or flexitime worker.
There are 3 types of shift pattern:
· Full/Part-Time standard rest day.
· Full/Part-Time floating rest day.
· Flexitime.
All shift patterns can be created for any duration.
|
|
Remember, before creating a shift pattern, the shifts required for use in the pattern should already exist. See Creating Shifts |

Following is an explanation of each option available when creating a new shift pattern.
Understanding standard shift pattern selections
Select General Maintenance > Shift Patterns.
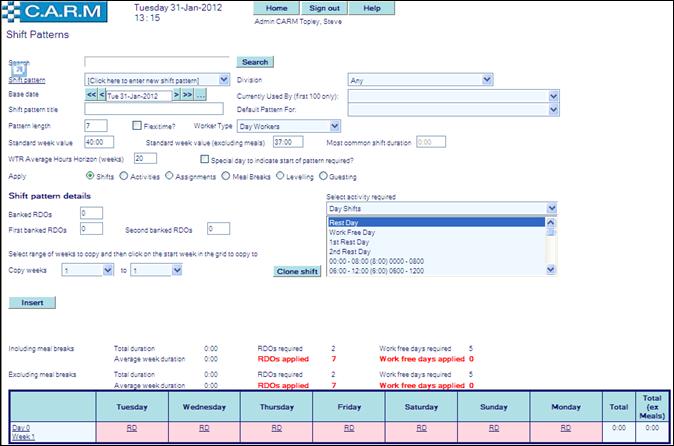
Search
Find and view an existing shift pattern.
· Enter the first character or few characters of the shift pattern title.
· Click Search.
![]()
· Shift Pattern drop down list will now show any matches.
· Select the required pattern.
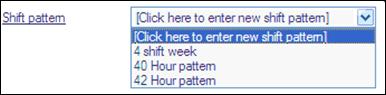
Shift pattern
Used during the search, (above) or select Click here to enter new shift pattern.
Division
Shift patterns may be created within specific Divisions. This helps with future searches e.g. when looking for a shift pattern to apply to an officer through Personnel Maintenance. If the pattern is non-specific e.g. Monday to Friday 0900-1700, use Any Division.
![]()
Currently used by
Shows individuals who are currently assigned to this pattern. The number displayed is limited to a maximum of 100.

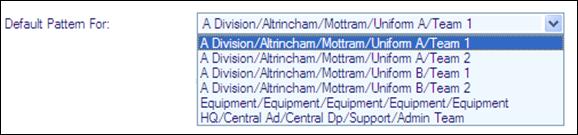
Default pattern for
Shows the Organization areas currently assigned to this pattern as their default in Organization Maintenance.
Base date
Specify start date of the pattern e.g. if the organization changes their shift patterns from a standard 8-week base to a 12-week base, or when creating a pattern for a new part-timer, use this to state when the new pattern starts.
Usually, patterns start on the organization start day of the week e.g. Sunday or Monday.
![]()
Shift pattern title
Specify a title or short description for the pattern. If the new pattern is used throughout the organization, choose something broad e.g. Uniform 28-day or Monday to Friday 0900-1700.
![]()
If pattern is specific to a person e.g. use a name that is easily identifiable to users e.g. Part-Time 9203 Jones.
|
|
Lists appear alphabetically. Keep naming consistent to help with selections e.g. if there are lots of part-time staff, start them all “Part-Time…” rather than “Jones 0923”, “2839 Peterson”. Restrict Shift Pattern Maintenance to limited users, if possible, to help control the format. |

Pattern length
The number of days before repetition
Flexitime?
Indicate if pattern is for flexitime workers.
![]()
Worker Type
· EEC requires that personnel who work this pattern are classed as Day Workers or Night Workers for European Working Time Regulations purposes. See the HR Department for more details.
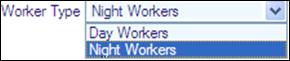
· Non EEC has this indicator set by a System Administrator (see Look Up Tables) as specified by the Organization. See the HR Department for more details.
Standard week value and Standard week value (excluding meals)
Enter Standard week value and Standard week value (excluding meals) to show the standard number of working hours per week (with and without meal breaks) for personnel on this shift. The calculated average week duration (with or without meal breaks as appropriate and depending on working conditions - see Shift pattern calculated values below) will be used with these values to determine any pro-rata of entitlements (e.g. annual leave) for part-time personnel operating this shift. For full-time personnel, this is usually set to the same as the calculated average week value (unless Levelling is to take place).
![]()
Most common shift duration
Displays the shift duration that is most common in the pattern. When a Public Holiday falls on a persons rest day, a cancelled rest day may be generated (dependent upon working conditions) with the same duration as that shown in: Most common shift duration, column of their pattern. The most common shift duration will automatically be calculated when the shifts that comprise the pattern have been entered.
![]()
WTR Average Hours Horizon (weeks)
EEC only: this value is used in Working Time Regulations Average Hours calculations as the number of weeks over which the average hours is to be calculated. To cater for Variable Shift Arrangements, this should be set to a multiple of the Pattern Length to ensure consistency in the calculations. For example, a 10 week Variable Shift Arrangements pattern where each week does not contain the same number of hours, but does result in an average week value of, say, 40:00 hours, the WTR Average Hours Horizon would typically be 20 weeks. As a further example, a 3 week Variable Shift Arrangements pattern where each week does not contain the same number of hours, but does result in an average week value of, 40:00 hours, the WTR Average Hours Horizon would typically be 21 weeks. The 'normal' value (default) is determined by a system control parameter (usually 17 weeks).
![]()
Special day to indicate start of pattern required?
Check this box if a special day indication is required in enquiries and duty planning that involve anybody on this shift pattern to show the start of each cycle of this shift pattern.
![]()
Apply
Select to apply Shifts, Activities, Assignments, Meal Breaks and/or Levelling (see below) into the pattern. The pattern will always comprise of shifts. However, add activities if required e.g. dog handlers may take half an hour at the end of every shift for kennel training, the mounted section may have similar for grooming. Or, there may be a cycle for such things as Duty Inspector (Assignment). These may be added to the shift patterns so the information is automatically created when the next month’s roster is generated. This saves time during the Duty Planning process later.
![]()
The following information changes dependent upon the selection made here.
Shift pattern details - Non Flexitime
Setting Shifts:
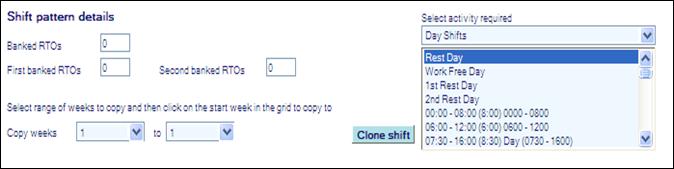
Select the shifts to include in the pattern. All shifts already created are shown in the list.
Banked Rest days, First rest days and Second rest days
Banked rest days (RTO's/RDO's) are used when not all personnel on this pattern have exactly the same rest days at the same time. Bank any number of rest days in the pattern for duty planners to allocate as and when suitable. There are possibly three types of rest day that may attract different compensation according to the appropriate working conditions.
Copy weeks
Copy weeks of a long pattern to later weeks e.g. a 52 week pattern and several weeks are the same or very similar. Simply enter the weeks to copy in the two boxes and then click on the appropriate Day number in the pattern grid to copy those weeks to e.g. Copy weeks 1 to 3, click on Day 29 (Week 5) and weeks 1 to 3 will be copied to weeks 5 to 7.
Clone shift
Create shifts from others, designed to assist if a shift has not been created before the pattern. (See Cloning shifts below)
Select activity required
Select appropriate shift and place it in the shift pattern grid. Repeat this action for each shift required (including rest days, work free days etc.) to build up the required shift pattern.
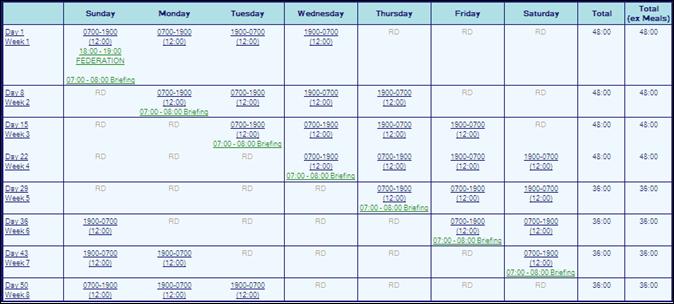
Shift pattern grid
Apply selected shift to the days required.
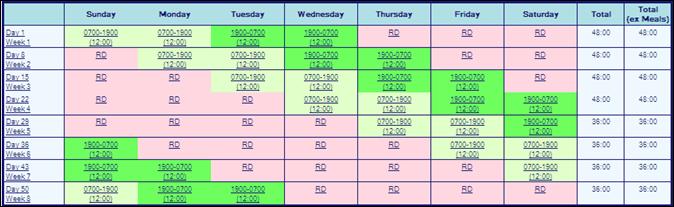
· Clicking on a Day/Week number copies the specified weeks to that week and subsequent weeks (see Copy weeks above).
· Clicking on a cell sets that cell to the currently selected shift (or Rest Day, Work Free Day).
· All changes are immediately reflected in recalculate values (see Shift pattern calculated values below).
Shift pattern details - Flexitime
Setting Flexitime Shifts:
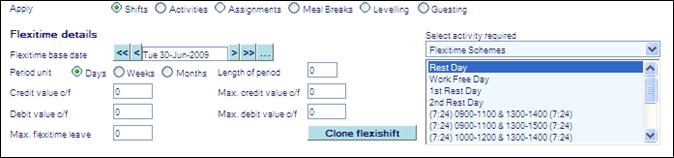
Select Flexitime & Shifts to include in the pattern. All shifts already created are shown in the list.
Flexitime base date
Start of the flexitime accounting period. It may be different to the shift pattern Base date.
Period unit
Is the period duration (Days, Weeks or Months).
Length of period
The number of period units equal to one accounting period length e.g. 1 month, 8 weeks.
Credit value c/f
Is the amount of ““over” time” a person can work in one accounting period and carry forward to the next period
Debit value c/f
Is the amount of ““under” time” a person can work in one accounting period and carry forward to the next period.
Max credit value c/f
Is the maximum amount of ““over” time” a person can work in one accounting period and carry forward to the next period, at management discretion only.
Max debit value c/f
Is the maximum amount of ““under” time” a person can work in one accounting period and carry forward to the next period, at management discretion only.
Max flexitime leave
Is the maximum amount of flexitime leave a person can take in any one accounting period.
Clone flexishift
Create flexitime shifts from others, designed to assist if a shift has not been created before the pattern. (See Cloning shifts below)
Shift pattern grid
Apply the selected flexitime shift to the days required.

· Clicking on a cell sets that cell to the currently selected flexitime shift (or Rest Day, Work Free Day).
· All changes are immediately reflected in recalculate values (see Shift pattern calculated values below).
Activity details
Setting Activities:
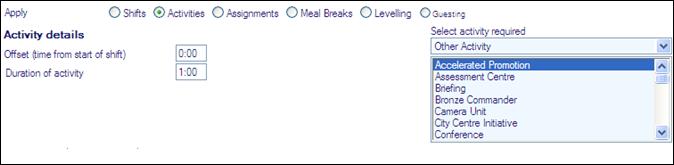
Select activities to include in the pattern. All activities are shown in the list.
Offset (time from start of shift)
Enter Offset start time of activity within any shift e.g. an Offset of 1:00 would set the activity to start 1 hour after start of the shift.
Duration of activity
Enter Duration of activity.
Activity grid
Apply selected activity to days required.
· Clicking on a Day/Week number sets currently selected activity on all shifts within that week.
· Clicking on a cell sets currently selected activity on that day.
· Activities cannot be set on non-working days.
· Multiple activities may be set on any shift (as in day 1 above)
· Clicking on an existing activity in a cell removes that activity.
Assignment details
Setting Assignments:
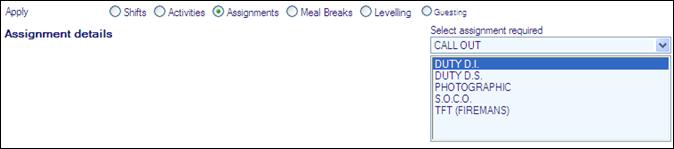
Select assignments to include in the pattern. All assignments are shown in the list.
Assignment grid
Apply selected assignments to days required.
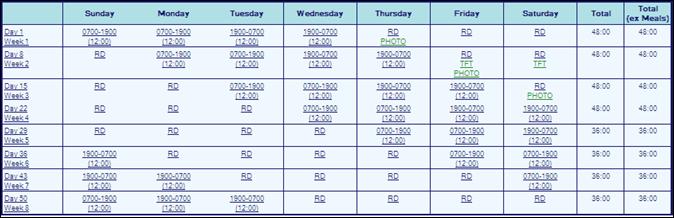
· Clicking on a Day/Week number sets currently selected assignments on all days within that week.
· Clicking on a cell sets currently selected assignment on that day.
· Assignments can be set on any day - working or non-working.
· Multiple assignments may be set on any shift (as in day 13 above)
· Clicking on an existing assignment in a cell removes that assignment.
Meal breaks
Setting Meal breaks:

Duration of meal break
Enter duration of the meal break.
Meal break grid
Apply your selected meal break to days required.

· Clicking on a Day/Week number sets currently selected meal break on all shifts within that week.
· Clicking on a cell sets currently selected meal break on that day.
· Meal breaks cannot be set on non-working days.
· Multiple meal breaks may not be set on any shift.
· Clicking on an existing meal break in a cell removes that meal break.
Levelling
Is where levelling rules are set for the shift. Levelling takes place when the calculated average week duration exceeds the standard week and determines what to do with the excess time in the shift.
When a Shift Pattern has its levelling rules changed then those parts of the organisation affected will need their Shift Levelling Entries regenerated from the effective date of the changes. (See Shift Regeneration)
Example
A typical 4 on, 4 off shift pattern with 12 hour shifts results in an 'average week duration' of 42 hours over the 8 week cycle of the shift pattern (8 weeks before such a pattern starts to repeat itself). Also, in such a pattern, 4 weeks of the pattern would have an ’actual week duration’ of 36 hours (3 shifts in the week) and 4 weeks of the pattern would have an 'actual week duration' of 48 hours (4 shifts in the week).
Select Levelling method required
· No Levelling (default)

Or
· Actual Week - Standard Week
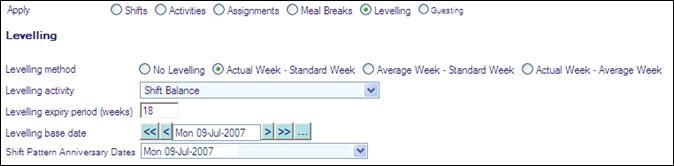
· Select Levelling activity appropriate time bank to be credited with levelling values, from drop down list
· Enter Levelling expiry period number of weeks ahead of base date and any anniversary date of that base date for which the credited levelling amount is to expire.
· Enter Levelling base date for first levelling value. A credit entry will be made in the time bank for each week which will have an expiry date calculated as the number of levelling weeks from the base date or anniversary based on levelling period.
· With a standard week value of 40 hours, and a levelling method of 'Actual week - standard week', 4 hours would be debited in each week where the actual week duration was 36 hours (40 - 36), and 8 hours would be credited in each week where the actual week duration was 48 hours (48 - 40), resulting in a total of 16 hours over each 8 week cycle of the shift pattern. With a levelling expiry period of 18 weeks and a levelling base date of 1st January 2005, each credit would expire on the next calculated 18 weeks (or any multiple of 18 weeks) after the base date.
· Levelling base date also determines the earliest date for which levelling entries are required. In this example, there will be no levelling entries earlier than 7/9/7. Select a suitable base date (usually on an anniversary date of the shift pattern) from the drop down list of Shift Pattern Anniversary Dates provided.
Or
· Average Week - Standard Week

· Select Levelling activity appropriate time bank to be credited with levelling values, from drop down list
With a standard week value of 40 hours, and a levelling method of 'Average week - standard week', 2 hours would be credited in each week (42 - 40), also resulting in a total of 16 hours over each 8 week cycle of the shift pattern.
Or
· Actual Week - Average Week (ensures 'core hours' are achieved)

· Select Levelling activity appropriate time bank to be credited with levelling values, from drop down list
With an average week value of 42 hours and a levelling method of 'Actual week - average week', 6 hours would be debited in each week where the actual week duration was 36 hours (42 - 36), and 6 hours would be credited in each week where the actual week duration was 48 hours (48 - 42), resulting in a total of 0 hours over each 8 week cycle of the shift pattern - and thus core hours of 42 hours per week have been achieved. To maintain core hours, planners need to just ensure that the balance in this time bank is zero.
Guesting within a Shift Pattern
Where a person will be working at different a venue as part of a regular Shift Pattern, each day may have the venue set using Guesting as required.
Select Guesting
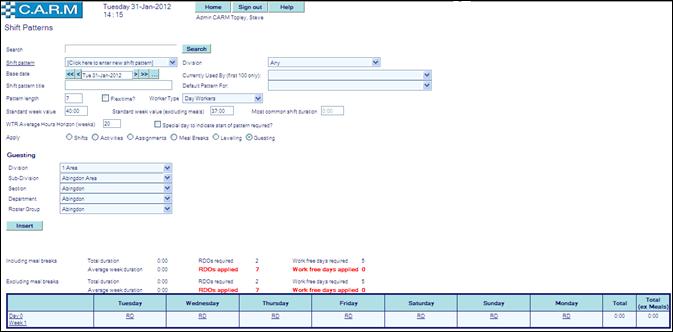
· Select Division to Roster Group as required.
· Click each required day shift detail in the grid to apply the Guesting venue.
· Continue as above for each day/venue to be applied.
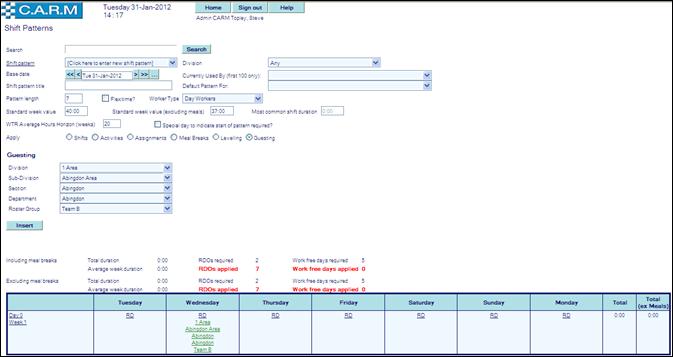
· Save the Shift Pattern as required.
· For further information see Guesting
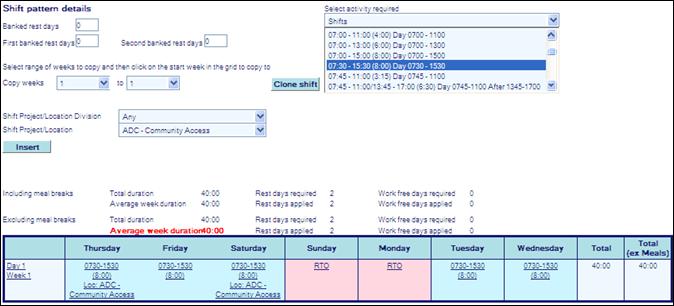
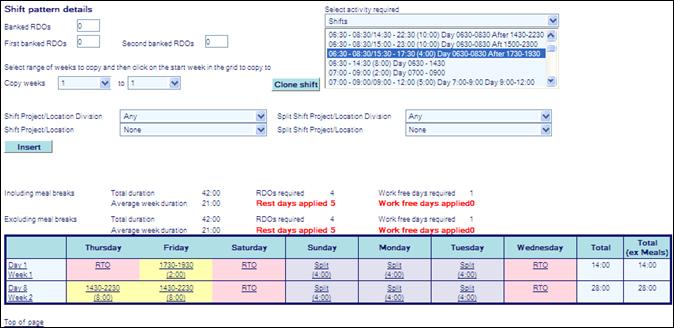
Project/Locations within a Shift Pattern
Select Apply Shifts
· Select activity required Shifts from the drop down box.
· Select the required shift from the drop down box.
e.g. single shift.
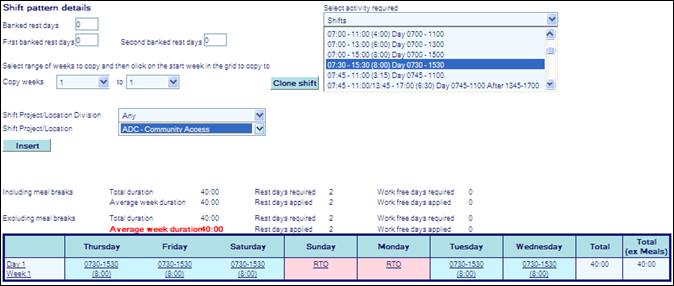
· Select Shift Project/Location Division from the drop down list as required.
· Select Shift Project/Location from the drop down list as required.
· Click each required day shift detail in the grid to apply the Project/Location.
· Continue as above for each day Project/Location to be applied.
e.g. single shift.
· Save the Shift Pattern as required.
e.g. split shifts
· Select Shift Project/Location Division from the drop down list as required.
· Select Shift Project/Location from the drop down list as required.
· Select Split Shift Operation Division from the drop down list as required.
· Select Split Shift Operation from the drop down list as required.
· Click each required day shift detail in the grid to apply the Operation.
· Continue as above for each day/Operation to be applied.
e.g. split shifts
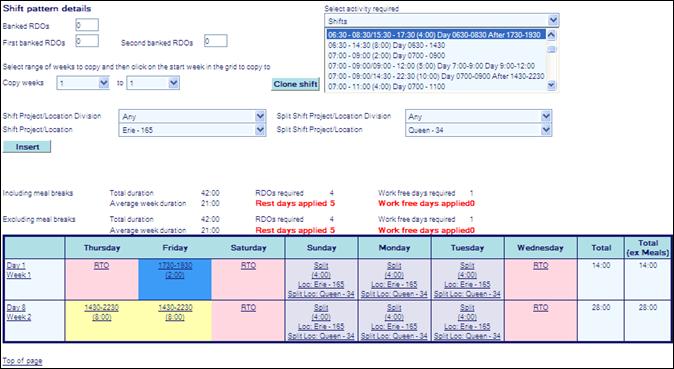
· Save the Shift Pattern as required.
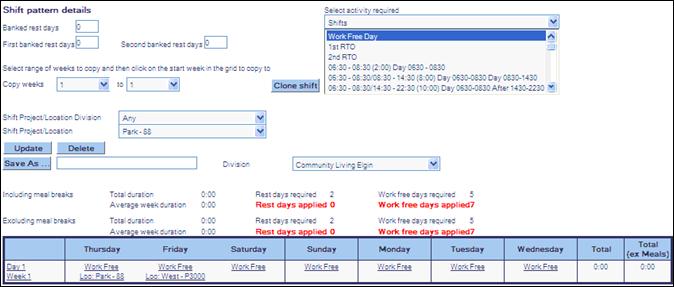
Project/Locations within a Work Free Shift Pattern (Casual Workers)
record a location against a day in a Work Free shift pattern to identify in-house Casual workers.
Enables Supervisors identify available qualified Casual workers if required for backfilling time periods.
· Select Shift from the Select activity required drop down list.
· Select Work Free Day from the drop down list.
· Select Shift Project/Location Division from the drop down list.
· Select Shift Project/Location from the drop down list.
· Click on each day of pattern grid required to enter the Work Free Date with the Location.
· Select Shift Project/Location Division from the drop down list for the next Location.
· Select Shift Project/Location from the drop down list for the next Location.
· Select Shift Project/Location as None for any location days.
· Click Insert to save the Shift Pattern.
Shift pattern calculated values

Shows calculated values based on entries in the shift pattern grid, meal breaks entered, rest days and work free days entered and banked and standard week values (including/excluding meal breaks). There are two sets of calculations shown. One for shifts where the shift time that includes meal breaks and one for the shifts that exclude meal breaks (e.g. an 8 hour shift with a 45 minute meal break will use 8 hours for the first set of calculations and 7 hours 15 minutes for the second).
Total duration: Is the total number of working hours the pattern contains.
Average week duration: Is the average hours worked in a week based on the pattern details entered: in red if the Average week value is exceeded.
Rest days required: Shows how many rest days should be included in the pattern. It assumes 2 rest days per week.
Rest days applied: Shows the number of rest days currently in the pattern: in red if there are more or less rest days than the value in Rest days required.
Work free days required: Is how many work free days need to be included in the pattern. It is usually used for Part-Timer patterns.
Work free days applied: Is how many work free days have been entered in the pattern.
Cloning a shift
An existing shift may be used, on which to base another new shift e.g. if after starting to create a pattern it is realised that a required shift does not exist.
· Select the shift to use as the basis in Select activity required.
· Click Clone shift or Clone flexishift.

· Change the shift information accordingly.
· Click Generate title to allow CARM to generate a title and caption based on the start and end times.
· Click Insert.
· The new shift will be added to the list of shifts to be selected
Or
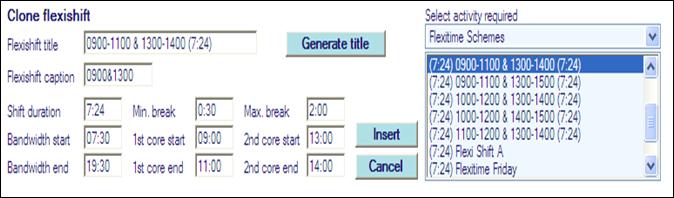
· Change the flexitime information accordingly.
· Click Generate title to allow CARM to generate a title and caption based on the start and end times..
· Click Insert.
· The new flexitime shift will be added to the list of flexitime shifts to be selected
Troubleshooting shift patterns
I forgot to attach my shift pattern to a division
· Select General Maintenance > Shift Pattern.
· Search Shift pattern
· Click Shift Pattern drop down.
· Select pattern from the list.
· Click New Division drop down.
· Select Division the pattern belongs to from the list.
· Click Update.
|
|
Also use these steps to change from a specified Division to Any. |
My rest days/work free days applied is red
There are too many or too few rest days or work free days in the pattern. Check Rest days required and compare the value with Rest days applied. If there are too few rest days, add the one(s) missed. If there are too many, remove the additional one(s). If needed, see the HR Department for assistance about which days to add or remove